- Install the add-on through the XenForo admin panel, as normal. For more information, consult this article.
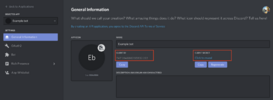
- Navigate to your XenForo admin panel -> Setup -> Connected providers -> Discord. Leave this page open as we will need to fill out the values.
- You will need to create a new Discord application by going here and then clicking "New Application".
- Set the "Name" to whatever you want your bot to be called and continue. You may optionally set a description and icon for your bot. Leave this page open as you will need to grab the values from here in later steps.
- On the left, click the heading named "OAuth2" and then copy the "Client ID" and "Client Secret" values and paste them in to the according fields for the Discord connected account provider in your admin panel (from step 2, above).
- Using the sidebar on the left, navigate to the OAuth2 section for your Discord application and click "Add Redirect". Fill in a URL in the form of your board URL followed by connected_account.php. So for example:
https://mysite.com/connected_account.php
- Using the sidebar on the left, navigate to the Bot section, click "Add Bot" and then accept the warning. Ensure 'Public Bot' and 'Require OAuth2 Code Grant' are both unchecked.
- Copy the "Token" displayed under the username for the bot and paste it in to the corresponding field in the Discord connected account provider in your admin panel.
- Set the "Name" to whatever you want your bot to be called and continue. You may optionally set a description and icon for your bot. Leave this page open as you will need to grab the values from here in later steps.
- You'll also need your Discord Server ID which can be obtained by following the steps listed here.
- Once you've obtained this, paste it in to the Guild ID field of the Discord connected account provider in your admin panel and finally, save the connected account provider.
- Navigate to your XenForo admin panel -> Tools -> Test Discord integration. Run the test and initially, it will be red and failing.
- Locate the "Invite bot to server" button, click it and follow the prompts to automatically add the bot to your server with appropriate permissions.
- Click "Open WebSocket" to ensure messages can be sent by the bot.
- Re-run the test and you should be all good to go.